DIY DIPPED TERRA COTTA SUCCULENT FAVOURS
Jan 11
1 Comment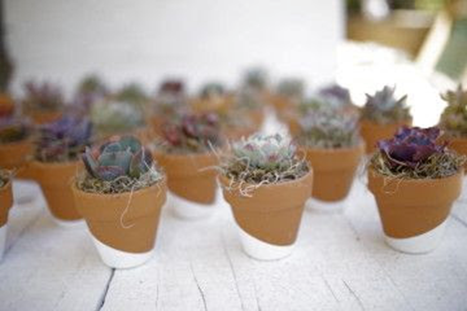
A step-by-step guide to create a DIY succulent arrangement
These have to be one of my favourite DIY succulent arrangements, perfect for any party or event, are the dipped terra cotta succulent pots. This project is a perfect afternoon, outdoor activity for adults and kids of all ages. These are great, too because you can tailor them to suit your event by playing with different paint colours and top-coat materials. You can easily use any small terra cotta pots that you may already have, or you can find really inexpensive ones at most garden centers or home improvement stores.
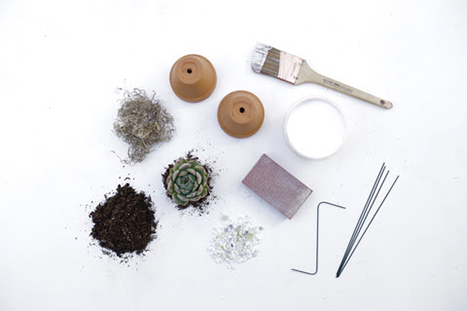
Terra Cotta Pots, Sand Paper or Blow Dryer, Paint, Paint Brush, Thick Floral Wire, Cardboard or Dropcloths, Soil, Succulents, Paper Towel, and Small Pebbles, Glass, Sand or Moss.
1. Remove all stickers from your containers, and use a fine grade sand paper and sand away any glue residue that remains or if you don’t have sand paper… TIP – Use a blow dryer to heat up the stickers. This loosens the glue and allows them to come right off of the pots, minimizing glue residue.
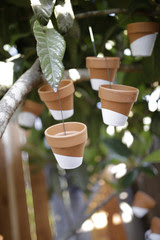
2. Prep your painting area by putting down pieces of cardboard or drop cloths under the area you’re going to hang your dipped pots. Hanging them allows them to drip-dry without messing up the bottom edge of the paint. (We like to find a nice tree with lots of branches and just let the paint drip onto the ground below).
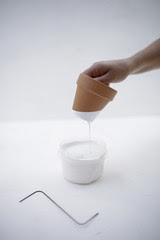
3. Have your paint cans opened, stirred, and ready for dipping. If you are using smaller amounts of paint pour it into a small container with a wide opening, creating some depth that you can dunk the pots into at an angle while not bumping the sides of the container. (Old ice cream containers are good for this)
4. Bend some pieces of your wire into a Z shape. The wire should be able to easily slip through the drainage hole in the bottom of the terra cotta pot and the top of the wire should be able to hang from a branch. We recommend you test a few on your pots before you start.
NB: If you’d like to cover up all the terra cotta and achieve a two-toned look, paint the pots all over with a brush in your base paint color first, and allow to dry completely before beginning the dipping processes.

1. To achieve an angled dip, hold your terra cotta pot at a 45 degree angle above the paint. Steadily dunk your pot about halfway into the paint and quickly remove it. (If you do this slowly your pot may fill up with paint).
2. Take one of your Z wires and feed it through the drainage hole. Bend the wire up snug to the bottom of the pot so it won’t fall out and then hang it from a tree branch to dry.
3. As your pots are drying, occasionally take a straight piece of floral wire and swipe it across the bottom of your terra cotta pot to remove any excess paint and drips that gather. You may have to do this several times before they dry.
4. Allow to completely dry before unbending and removing your wires from your dipped pots.
1. Take a small piece of paper towel and place over the drainage hole inside of your terra cotta pots.
2. Add a small amount of dirt to hold the paper towel in place and then proceed plant your succulent so that the bottom of the plant is level with the top of your pot.
3. Finish your pots by adding a rock, glass, sand, or moss top coat to cover any exposed soil and Wa-La, you’re done!

You can add little flags with guest’s names on them and then these super cute succulent favors can double as a place setting for your event.
Search the article
Most Popular
-

Succulent Bowl Workshop
Aug 4, 2016
-

Succulent Bowl Workshop
Jul 7, 2016
-

Mother’s Day Succulent Bowl Workshop
Apr 15, 2016